Wednesday, December 12, 2012

DIY: Have Yourself a DIY Christmas

Oh, look, it's just how I paint: sitting at my easel lookin' all 1950's glam with my puppy assistant. Except instead of a gown, I'm usually painting in my sweatpants (yes, I own one pair) and in place of a cute pup, I have an obese kitty who walks through my paint. But one can dream.
 As Christmas approaches, I'm coming to terms with a few issues I have. Well, okay, I have many an issue but for now, let's just chat about the ones concerning the holidays. So far, I've come up with these:
  1. I have a penchant for phoney-baloney pre-lit dwarf-sized Christmas trees. And if they are tinsel tress in some tacky color like pink, green or gold, I love them all the more.
  2. I have to make the majority of my Christmas decor. I can't buy it because that somehow feels like cheating . So at Christmas my house looks like some 4-H fair craft display. And I kinda like it.
  3. Once I start decorating for Christmas, I Just. Can't. Stop.
I created these paintings last year. The larger green painting I based off of a vintage Christmas card. I had picked up this little wooden house shape years ago at the thrift store. After painting the green canvas, I painted this little house to go with it. This sits in the front room of our house on my decked out easel.

For that over-decorating reason, I don't have any brand spanking new DIY's this week. So I thought I'd share with you a peak around my pad at DIY's of Christmas past. I'll just be giving a brief description of each as I still have more decorating and cleaning to do before the hub's work party goes down here on Friday night. On top of that, I've got a Tacky Christmas Sweater to whip up and the awards for the Tacky Christmas Sweater Contest we're having at school tomorrow. Whew! It really is the most insanely busy (and wonderful!) time of the year.

Enjoy! And if you have any questions about these DIY's, please feel free to ask.
I scored my first pre-lit tree of the year on Black Friday. I planted it inside of a paper suitcase that my mother-in-law gave me for my birthday last year. I created the paper chains years ago and they make an appearance every year, much to hubs dismay. He's not a fan of el paper chain-o.
 I created these hot air balloons ornaments with light bulbs, vintage fabric, Modge Podge and a bottle cap.
Despite the fact that this pre-lit tree is only partially lit (which is exactly how I like to spend my holidays), I still adore it. It sits in my living room surrounded by a couple of Rudolph paintings I created two winters back.
My favorite Christmas special has always been Rudolph. I used my Golden Book from childhood as the inspiration for these canvas board paintings.
 Favorite scene from Rudolph where Rudolph befriends fellow-misfit wanna-be dentist elf Hermey:

Hermey: Hey, what do you say we both be independent together, huh?
Rudolph
: You wouldn't mind my - red nose?
Hermey
: Not if you don't mind me being a dentist.
Rudolph
: [shaking hands with Hermey] It's a deal.
I scored this pre-lit tree for cheap at Goodwill just this week. I added my paper doll collection as well as some vintage sewing notions.
This tree has everything I want for Christmas on it: gorgeous vintage dresses!
Last Christmas, I discovered pinterest and my life was never the same. I created that wreath with my collection of vintage glass ornaments. I began by yarn wrapping the wreath and then hot gluing the ornaments onto it. I then picked up tulle in the same colors and cut that into strips. I tied the strips of tulle onto a string of white Christmas lights.
Ya'll might remember my pink cuckoo clock tree from this post. My dream tree is a real vintage pink aluminum one. But for now, this one next to my mantle in the living room will have to do.
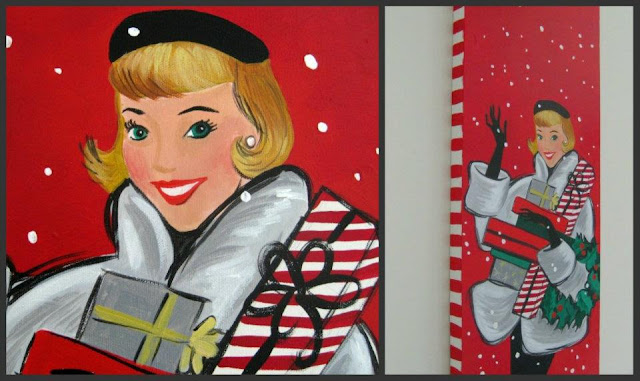
If only my Christmas shopping were so glamorous. I'm usually just clicking away on amazon in the wee hours of the morn. I painted this long painting right before painting the green one at the beginning of this post. These paintings remind me that I've not picked up a paint brush in some time. I need to do that. If I could step away from the sewing machine long enough.
Just a little close up.I have found that adding candy cane stripes to the edge does a great job of hiding smudges of paint and mistakes.
 Thanks for dropping by. I do hope your holidays are shaping up to be just plain fabulous!


Sunday, December 9, 2012

What the Art Teacher Wore #45

Sausage-Sellin' Monday: When I was in Germany this summer, I picked up this dirndl because I knew the kids would enjoy seeing it during our study of Germany. And because I just love it. Dressing as dorky as I normally do, I didn't think twice about hitting the grocery after work in this getup. That is until the check out lady asked, "Hey, where do you work?" (before I could answer, she continued), "Do you work at the mall sellin' them sausages? What do they call that place?" Luckily the bag-gentleman was able to offer assistance, "It's called Hickory Farms, I think." Check out lady, nodding, "Yeah! That's it! You work at that place?" I hated to disappoint as they both seemed sad and perplexed that I was an art teacher. "But we're learning about Germany! And they do love sausage!" dirndl: Germany; boots: Seychelles; tights: Target
Dunno if you noticed or not, but I took What I Wore this Week off last week. Last week was a rough one that hit full tilt craptasticness on Thursday. I had gotten a late start that morning but just knew I had to wash my beyond-dirty mop of hair. Which made my late start even later. To compensate, I did minimal hair- and make up-doin' and rushed out the door. This I would regret as the following convo happened during my first class:

Kid: Mrs. Stephens, what's wrong with your hair? It's all [making an odd gesture around her head] messy.
Me: Well, um, I washed it today.
Kid: Where? [looking around the art room and then with a horrified expression] In the art room sink?!
Oh, look, it's my summer home in Bavaria, Germany. My fourth grade students are currently learning about Schloss Neuschwanstein (that'd be Neuschwanstein Castle to you English-speakin' folk) so I thought I'd include that in the artsy part of this outfit post. Hubs and I went with his boss and family a couple of winters ago. I'll share some of my photos of that trip too. This image I pulled form pinterest.
Yeah. Nice. Later I overheard a third grader say to another, "Oh, Mrs. Stephens is looking tired today." Defensively, I replied, "I'm not tired!" Looking at me sympathetically, she said, "Oh, maybe it's just your eyes then. [did I mention I had skipped my cat eye make up that day?] They look really tired."
The dashing King Ludwig II was born in 1845 and became king of Bavaria at the young age of 18. He is sometimes called the Swan King, the Fairy Tale King or just Mad King Ludwig. He acquired the first two names because his palace is near Swan Lake and the fairytale-esque castle he had created. And although his brother Otto was considered insane, the last nickname isn't accurate for King Ludwig II. He was definitely an eccentric but not insane.
But the cherry on the Super-Sucky Sundae was when kindergartenland came to my room.

We had thirty minutes to create a clay animal, get it put away, get our tables wiped down and get outta the room for the fourth grade. As you can imagine, we didn't make it. I had a coupla cryers, heads falling off animals, three-legged mutant mammals and one kid pee themself. AND we ran out of baby wipes. Which made for dusty crusty hands all around.

 When I was in the midst of the madness, I looked up at the clock and realized we just weren't gonna make it. In fact, time was already up, fourth grade was waiting at the door. Now, I have to tell you, my fourth graders are simply the best. I asked them to come in, buddy up with the kindergartener that was in their seat and help them get cleaned and lined up. And they did.

As the fourth grade and I sat down to finally begin our lesson and the kindergarteners were walking out the door, I heard one of my fourth graders say, "uh, Mrs. Stephens..." and tilted his head in the direction of a kindergartener. Who was licking the clay off his hands from the bottom of his palm all the way up to his fingertips. Before I could say anything to him, he waved goodbye with his other hand and walked out the door.

Yeah. So. It was a bad day. But I had to share it with you because, thankfully, now it's kinda funny. Except for the clay lickin'. That's just gross.
Cut The Lights! Tuesday: So when each class came to art, I invited them in, dimmed the classroom lights and turned on my dress, much to their delight. The only problem? I had one kindergartener that was obsessed with the light up dress. She kept telling me to "cut the lights!" so we could see the dress again. Eventually we had art in the dark. light up dress: made by me; tights: Target; shoes: dolls by Nina; sweater: thrifted
A view of Neuschwanstein from Hohenschwangau Castle. When you go to Neuschwanstein Castle, you park your car at Hohenschwangau Castle, a fantasy-style castle Ludwig's father had built near the Schwansee (Swan Lake). You can either take a carriage ride up the steep hill to the castle or walk. We opted for the carriage ride.


If this castle looks kinda familiar to you, that might be because Walt Disney used it as his inspiration when creating Sleeping Beauty's Castle in Disneyland.
Light Up Wednesday: When you make one light up dress, the kids expect you to light up all the time. So this outfit was a bit of a disappointment to the kids. sweater and skirt: vintage, thrifted; white blouse: gift; tights: Target; shoes: Clarks
In 1864, King Ludwig II began sketching out his plans for his palace which was intended to be a personal refuge for the very private king. The castle was funded by Ludwig's family fortune and borrowing, not with money from Bavaria. However, now with as many as 6,000 visitors a day in the summer, the palace provides much money for Bavaria.
Growing up a prince, King Ludwig II didn't have much of a childhood. He was constantly working on his studies and future duties of becoming a king. For that reason, he had a fascination with the carefree fantasies and imaginative fairy tales he heard in his childhood. While growing up, he spent a lot of time at his father's beautiful castle Hohenschwangau.
Cat Attack Thursday: My cat loves these shoes. Loves to attack them. So when I wear them, I have to put them on in the car. Either that or deal with runs in my tights and bloody legs. By the way, everything I'm wearing has a touch of DIY: I created the buttons on my sweater from clay, added lace to the bottom of my dress and crated these shoes. dress, sweater, shoes: thrifted; tights: Target
I created these last winter with a pair of t-strap shoes I found at Goodwill. You can read more about that DIY here.
I was so excited to find this Anthropologie sweater at the thrift store. Until I noticed it was missing buttons. I couldn't find any that I liked at the craft store so I created these bad boys out of clay. I pounded the clay onto a doily, cut out the circle shape, added the button holes and glazed them a satin gray.
During the Middle Ages, there were three castles that over looked the villages. One of those was called Schwanstein Castle. In 1832, Ludwig's father King Maximilian II of Bavaria bought the  ruins and replaced them with Hohenschwangau Castle. This is the castle that inspired Ludwig II. The ruins above the family palace later became the site for King Ludwig II's Neuschwanstein. Initially, the plan was to incorporate the older castles into the design of the new one, but for whatever reasons, that didn't work. 
Hubs and I a couple of winters ago. We are standing in front of what was to be a chapel had the interior been completed. Only 15 rooms of the castle were completed before the death of the king at the age of 41. Had the castle been finished, it would have consisted over around 200 rooms and been nearly 65,000 square feet.
Candy Cane Kinda Friday: This is actually a summer dress I scored in Germany...but it just looked so candy-cane-y I had to wear it. sweater: vintage, thrifted; green fishnets: Marshall's?
Sadly, King Ludwig II's creative and eccentric ways were his downfall. Being extremely introverted, the King avoided public functions and his kingly duties. This ticked off his government ministers but not the people of Bavaria. He was known for taking trips across the countryside, chatting with the farmers and people he met.
Even though the King paid for his castle project with his own funds and money borrowed, Bavaria still suffered financially. For this reason, the government ministers decided to get rid of their King. The only way to do it constitutionally was to have the King declared insane. Not long after his removal from the throne, the King died a mysterious death. At the time, it was ruled suicide...but there are theories his enemies shot him and left him to die at Lake Starnberg.
If you've managed to get this far, thank you for indulging me this super long blog post. I have really enjoyed sharing my art history research in these posts as it helps me prepare for my lessons. 

I hope you have a wonderful week!


Thursday, December 6, 2012

In the Art Room: Parisian Silhouettes

What better way to say "au revoir" to Paris, France than by hot air balloon? Or hand glider? Or, what the heck, a parachute attached to one's head (that poor dude on the far left kinda makes me giggle).
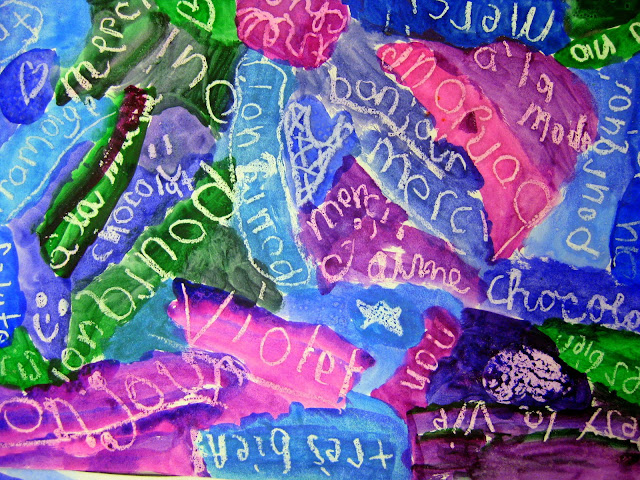
 I'm here to share with you the second Parisian-themed project my totally awesome third grade artists just finished up. We actually began this project at the introduction of our French unit when we were learning how to speak and write in French (you might recall a certain pink poodle named Fifi introduced us to the language of love). If you take a close look at the crayon resist in the background, you'll notice a little of our French vocabulary.
I just now noticed how this incredible artist somehow managed to cut out a tiny person in her hot air balloon. These artists always amaze me.
 But I'm getting a little ahead of myself. Let me tell you how we went about creating our Super Silhouettes:
  1. We began with 12" X 18" heavy stock drawing paper. I learned a long time ago that anything below 60 lbs paper is just junk. We used white oil pastels to write French words all over our papers. We chatted about variety, fonts and threw in a couple drawings of the Eiffel Tower and the Arc de  Triomphe when the writing became too tedious. 
  2. From there we began our water color painting portion of the project. I never really was a fan of watercolor paint with children because I always found the colors to be very, well, watery. And pale. However, when I learned about Crayola's Mixing Sets, I became an overnight watercolor-with-children convert. These are available in most art supply catalogs. Don't want another plastic case of watercolors? Remember, you can purchase individual colors. My favorites in the set are fuschia, turquoise, red-orange and blue-violet.
 3. I did limit the kids to either warm or cool colors with fuschia being the swing color. When introducing watercolor, I demo to the kids how to moisten each color with a drop of water and twirl the brush around in the color on it's tippy-toes like a ballerina (no scooting the brush around on it's bottom and giving it spider legs). I emphasize how the colors should be translucent, not opaque. Painted areas should have a watery appearance, not dry, scratchy brush marks. And, of course, everyone lets out a squeal when they see how the oil pastel resists the watercolor. Much better than a crayon, by the way.
 4. On the second day of Watercolor Wonderland, I introduce a couple of tricks. I demonstrate double dipping the brush, first loading it with one color and then adding a different color to the tip. When the brush is laid on the paper on it's side, it produces a gradation of a couple colors. You can see that best in the word "violet" in the painting above.
5. Another trick is the introduction of salt. When sprinkled on damp paper, it absorbs the paint and produces a beautiful snowflake effect.
 6. Once finished, we had a chat about some of the most famous places in Paris. We also discussed what a silhouette was and brainstormed some ideas of what we could add to a silhouette landscape. I created the above poster so the kids could see some ideas. Symmetry was emphasized.
I love the "Paris" above the Eiffel Tower.
We did have some chats about scale...and decided that large silhouette cut outs would have the appearance of being in the foreground while small cut outs look to be in the background. Unless that happens to be a giant hand glider dude. With super long arms. In which case, that theory is out the window.
A kite?! Genius.
 When I told the kids that we were going to be saying "au revoir" to Paris, France and "guten tag!" to Germany, they seemed sad to go. When one of them asked if I was going to repaint my windows for Germany I believe I said the words, "are you crazy?! No!" To which the questioner replied, "good! Then we aren't really leaving Paris!" 

And that made me pretty happy. Almost as happy as these sweet silhouettes.


Monday, December 3, 2012

DIY: Blue Christmas Dress


 As you read this, you might be sitting in your decked-out-for-the-holidays living room. Complete with a bedazzled and trimmed tree, wreath on the door, candles flickering in every window and lights strung outside the house.

If you came over to my house, you'd find a couple of pumpkins on my front step, flowers still blooming in planters (darn petunias just won't die!) and a bedazzled and trimmed pink Christmas tree. It kinda looks like Holiday Goulash. I'd apologize to my neighbors if they were still speaking to me.

Despite all that, what I do have is one completed Christmas dress! And not just any ole completed Christmas dress but one that Lights Up!! That's right, something that rad calls for Unnecessary Capitalization and Multiple Exclamation Points!! Eat That, Grammar Po-Po.
No, that's not my beeper. I upgraded to a cell phone last week. It's my battery pack for my LED lights.
I couldn't resist this vintage reproduction fabric when I found it at my local fabric shop. I scooped up three yards and decided to go with another version of the Simplicity pattern I used for my Cuckoo Clock Dress. This time, I went sleeveless for a coupla reasons: one, if you know me at all, you know I hate putting in sleeves. Like, hate isn't even a strong enough word. Despise. Detest. De-reallydon'tlike. And, two, I felt sans sleeves would give this dress a vintage vibe.

 But the idea to create a light-up dress didn't happen until hubs and I took a trip to his fave store in the whole universe: Big Lots.

Now, my hubs is an Idea Man. He is constantly coming up with new ideas for food trucks (my fave: the Organic Create-Your-Own-Flavor Cotton Candy Cart), clothing, and, of course, musical instruments. I usually know when a Big Idea is coming because his sentences begin with, "Tell me what you think of this..."

And that's what happened when I was wandering the isles of B.L. on Saturday, checking out where all ya'll snagged your Christmas decor. Hubs pointed out the little box of lights and said, "Tell me what yo think of this: You make your Christmas dress light up."
 Now, sometimes, hub's big ideas are just too big. But once he explained this one, I began to think it was doable. With his help, it was actually a piece of cake. 

You can make any ole dress light up. Here's how you do it:
  •  Sew a 2" hem at the bottom of your dress with a piece of twine that has a long enough tail to hang out of the opening of the hem. Leave about a 6" opening at the center front of your dress, right underneath the pockets.
  • Seam rip a hole in your pocket.
  • Feed the end of the LED lights through the hole.
Originally, I was going to sew in two strings of lights but the weight of two battery packs in my pockets didn't seem ideal. Hence the two strands of twine.
  •   Tie the end of the lights to the end of a piece of twine and pull through. I'm making that sound very easy...it was actually a two person job.
  • Untie string from the lights and close most of the hem opening.


 Dress front and back. This dress version of the Simplicity dress actually went by quickly. Skipping those four hour sleeves really helped. Normally I'd need sleeves in December but so far, no. It's been almost 70 degrees for the last coupla days.

This bodice is different than the other dress too in that it doesn't have that inverted V thingie. Thankfully.
 So you know, sewing a blue Christmas dress means I had Elvis' Blue Christmas running through my head the entire time. I managed to score this unopened album over Thanksgiving for a mere $3! It's been spinning on my record player since.
 And so there you have it! A Blue Christmas Dress. I'm pretty stoked and I can't wait to wear it to school. The kids are always full of questions and curiosity when I wear I dress I've created. 

Okay. I'm off to remove my pumpkins, planters and finish the Christmas decoratin' I've started. Because the song goes "I'll have a Blue Christmas..." not "I'll have a Pumpkin on my Porch for Two Months Christmas." Although that does have a certain ring to it...